How to Create a Double-Exposure Image in Photoshop
Hi. This is Marty from Blue Lightning TV. I'm going to show you how to create a double-exposureimage from 2 photos. If you'd like to use this image, I provided its link in my video'sdescription or project files. For the second photo, you'll get the best results if theperson you choose has deep shadows on one side like these examples that I got from Shutterstock. com. It doesn't matter if they're color or black and white. However, if your photo has generallighting like this one, I'll show you how to transition it into deep shadows. If you'dlike to use this photo, I provided its link. The first step is to create a selection aroundyour subject. For this example, I'll use the Quick Selection Tool. I'll make the tool'ssize 10 pixels and drag over the subject to select it. I can click either the Refine Edge button or go to Select and Refine Edge. I did an in-depth tutorial on Refine Edge, soif you'd like to watch it, I provided that link, as well.
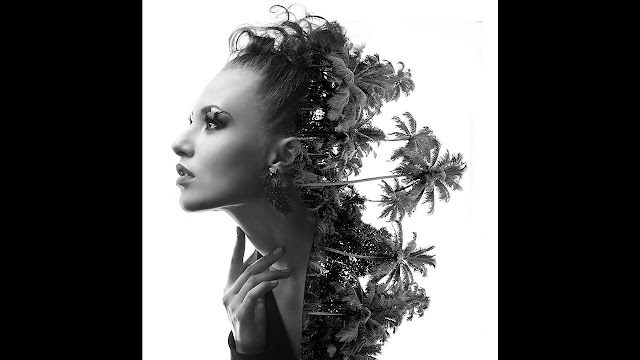
I'll check Smart Radius andadjust its size to make the brush big enough to cover the edge of the hair. I'll output it as a New Layer and click OK. Remove all its color by pressing Ctrl + Shift + U on Windowsor Cmd + Shift + U on a Mac. To adjust its brightness and contrast, open your Levelswindow by pressing Ctrl or Cmd + L. Drag the white and black Input levels to the point just before where the histogram really starts to rise and click OK. To make room for the tropical trees,make sure your subject is positioned to one side of your document. Justpress “v” to open your Move Tool and drag it over. Make a copy of it by pressing Ctrl or Cmd + J. Click the "fx" icon and click "Gradient Overlay". Change the Blend Mode to "Multiply" and click the gradient bar. Click the "Black, White" gradient and click OK. Make the Angle: minus 180 degrees and the Scale: 40%. Then, click OK. To restore some of the brightness on her face,click the Layer mask icon to make a layer mask nextto the active layer. Open your Brush Tool and Brush Picker. We'll adjust the size in a moment. Make the Hardness: 0% and the Opacity and Flow: 100%. Then, press Enter or Return. To make your brush larger or smaller, press the right or left bracket keys on your keyboard. Now, brush over your subject in areas where you'd like to restore its original brightness. Click the bottom layer to make it active and click the New Layer icon to make a new layer above it. We'll fill the empty layer with white. To do this, press Shift + F5 key at the top ofyour keyboard to open the Fill window. Or, you can go to Edit and Fill. Open the fly-out menu, click White and click OK. Open the image you'd like to blend into the person. You canuse this one, but feel free to use anything you want, as long as its bottom is relativelydark and dense and ends somewhere at its top. Ultimately, we want the top of the image tobe pure white. If you're using image, too, open your Dodge Tool. If your foreground colorisn’t white, press "D" on your keyboard to make your foreground and background colorsblack and white respectively, and then, press "x" to invert them. Make the Range: Highlightsand the Exposure: 100%. Adjust the size of your tool and brush over the sky. To place the trees onto your subject,press "v" to open your Move Tool and drag it up onto thetab of your subject. Without releasing your mouse or pen, drag it down onto the image andrelease. We want to place the trees on top of the person. To do this, just drag the treeslayer to the top of the Layers panel. Go to Edit, Transform and "Rotate 90 degrees Clockwise". Let's temporarily reduce its opacity, so we can see the subject under it. To resize and position it, open your Transform Tool by pressing Ctrl or Cmd + T. Go inside the Transform andposition the trees or whatever else your image is over your subject. You can always repositionand resize it later, if you want. Press Enter or Return to accept it. Increase its opacity back to 100%. Click the Layer Mask icon to make a layer mask next to the active layer. Press “B” to open your Brush Tool. Increase your brush size a bit and brush over the leftside of the trees to mask them out. To restore back areas of the trees, press "x" to invertyour foreground and background colors and adjust the brush size if you need to. Now,brush over those areas of the trees you want to restore back. Continue to finesse yourimage brushing in and restoring back areas until the two images create a double-exposure. This is Marty from Blue Lightning TV. Thanks for watching!

I'll check Smart Radius andadjust its size to make the brush big enough to cover the edge of the hair. I'll output it as a New Layer and click OK. Remove all its color by pressing Ctrl + Shift + U on Windowsor Cmd + Shift + U on a Mac. To adjust its brightness and contrast, open your Levelswindow by pressing Ctrl or Cmd + L. Drag the white and black Input levels to the point just before where the histogram really starts to rise and click OK. To make room for the tropical trees,make sure your subject is positioned to one side of your document. Justpress “v” to open your Move Tool and drag it over. Make a copy of it by pressing Ctrl or Cmd + J. Click the "fx" icon and click "Gradient Overlay". Change the Blend Mode to "Multiply" and click the gradient bar. Click the "Black, White" gradient and click OK. Make the Angle: minus 180 degrees and the Scale: 40%. Then, click OK. To restore some of the brightness on her face,click the Layer mask icon to make a layer mask nextto the active layer. Open your Brush Tool and Brush Picker. We'll adjust the size in a moment. Make the Hardness: 0% and the Opacity and Flow: 100%. Then, press Enter or Return. To make your brush larger or smaller, press the right or left bracket keys on your keyboard. Now, brush over your subject in areas where you'd like to restore its original brightness. Click the bottom layer to make it active and click the New Layer icon to make a new layer above it. We'll fill the empty layer with white. To do this, press Shift + F5 key at the top ofyour keyboard to open the Fill window. Or, you can go to Edit and Fill. Open the fly-out menu, click White and click OK. Open the image you'd like to blend into the person. You canuse this one, but feel free to use anything you want, as long as its bottom is relativelydark and dense and ends somewhere at its top. Ultimately, we want the top of the image tobe pure white. If you're using image, too, open your Dodge Tool. If your foreground colorisn’t white, press "D" on your keyboard to make your foreground and background colorsblack and white respectively, and then, press "x" to invert them. Make the Range: Highlightsand the Exposure: 100%. Adjust the size of your tool and brush over the sky. To place the trees onto your subject,press "v" to open your Move Tool and drag it up onto thetab of your subject. Without releasing your mouse or pen, drag it down onto the image andrelease. We want to place the trees on top of the person. To do this, just drag the treeslayer to the top of the Layers panel. Go to Edit, Transform and "Rotate 90 degrees Clockwise". Let's temporarily reduce its opacity, so we can see the subject under it. To resize and position it, open your Transform Tool by pressing Ctrl or Cmd + T. Go inside the Transform andposition the trees or whatever else your image is over your subject. You can always repositionand resize it later, if you want. Press Enter or Return to accept it. Increase its opacity back to 100%. Click the Layer Mask icon to make a layer mask next to the active layer. Press “B” to open your Brush Tool. Increase your brush size a bit and brush over the leftside of the trees to mask them out. To restore back areas of the trees, press "x" to invertyour foreground and background colors and adjust the brush size if you need to. Now,brush over those areas of the trees you want to restore back. Continue to finesse yourimage brushing in and restoring back areas until the two images create a double-exposure. This is Marty from Blue Lightning TV. Thanks for watching!
How to Create a Double-Exposure Image in Photoshop
 Reviewed by
Narooht
on
8:22 AM
Rating:
Reviewed by
Narooht
on
8:22 AM
Rating:
Reviewed by
Narooht
on
8:22 AM
Rating:


No comments :